Nest.js에서 Exception을 각 모듈별로 관리하기 하기위하여 ExceptionFilter를 이용해보기로 하였습니다.
이 글의 최종 형태는 다음과 같습니다.
create(signUpRequestDto: SignUpRequestDto): Observable<Omit<User, 'password'>> {
    this.checkUserAndThrowError(signUpRequestDto.email);

    return this.authService.hashPassword(signUpRequestDto.password).pipe(
      map(hashedPassword => {
        const user = this.userFactory.createUser(signUpRequestDto.email, hashedPassword);
        const { password, ...result } = user;
        this.userRepository.save(user);
        return result as Omit<User, 'password'>;
      }),
    );
  }

  checkUserAndThrowError(email: string): void {
    const user = this.userRepository.findOne({ where: { email } });
    if (user) {
      throw new AuthException(AuthExceptionType.CONFLICT_DUPLICATE_USER);
    }
  }
객체지향적 설계를 위하여 유저 체크하는 부분을 따로 빼주고 싶었으며 exception을 사용할때 각 모듈별로 Exception을 관리하며 오류 종류에 대한 정보도 따로 관리하고자 하였습니다.
1. BaseExceptionType 생성
path: /src/common/exception/exception.type.ts
import { HttpStatus } from '@nestjs/common';

export interface ExceptionType {
  status: HttpStatus;

  timestamp: Date;

  exceptionCode: number;

  message: string;
}
Exception response로 내보낼 interface를 생성합니다.
2. BaseException Class 생성
path: /src/common/exception/base.exception.ts
import { HttpException } from '@nestjs/common';

import { ExceptionType } from './exception.type';

export class BaseException extends HttpException {
  constructor(exceptionType: ExceptionType) {
    super(exceptionType.message, exceptionType.status);
    this.statusCode = exceptionType.exceptionCode;
    this.timestamp = exceptionType.timestamp;
  }

  statusCode: number;

  timestamp: Date;

  path: string;
}
BaseException은 모든 Exception response의 규격을 맞추기위하여 생성하였습니다.
BaseException은 HttpException을 상속받습니다.
3. AuthException Class 생성
path: src/auth/exception/auth.exception.ts
import { BaseException, ExceptionType } from 'src/common/exception';

export class AuthException extends BaseException {
  constructor(exceptionType: ExceptionType) {
    super(exceptionType);
  }
}
만들어둔 BaseException을 그대로 받아 생성합니다.
4. AuthExceptionType Class 생성
path: src/auth/exception/auth.exception.type.ts
import { HttpStatus } from '@nestjs/common';
import { ExceptionType } from 'src/common/exception';

export class AuthExceptionType implements ExceptionType {
  constructor(status: HttpStatus, timestamp: Date, exceptionCode: number, message: string) {
    this.status = status;
    this.timestamp = timestamp;
    this.exceptionCode = exceptionCode;
    this.message = message;
  }

  status: HttpStatus;

  timestamp: Date;

  exceptionCode: number;

  message: string;

  static CONFLICT_DUPLICATE_USER: AuthExceptionType = new AuthExceptionType(
    HttpStatus.CONFLICT,
    new Date(),
    4090,
    '이미 존재하는 유저입니다.',
  );
}
다음과 같이 작성하게 된다면 static CONFLICT_DUPLICATE_USER와 같이 각 모듈별로 Exception을 관리 할 수 있습니다.
5. HttpExceptionFilter 작업
path: src/common/exception/http.excepiton.filter.ts
import { ExceptionFilter, Catch, ArgumentsHost, HttpException } from '@nestjs/common';
import { Request, Response } from 'express';
import { BaseException } from './base.exception';
@Catch(HttpException)
export class HttpExceptionFilter implements ExceptionFilter {
catch(exception: BaseException, host: ArgumentsHost) {
const ctx = host.switchToHttp();
const response = ctx.getResponse<Response>();
const request = ctx.getRequest<Request>();
const status = exception.getStatus();
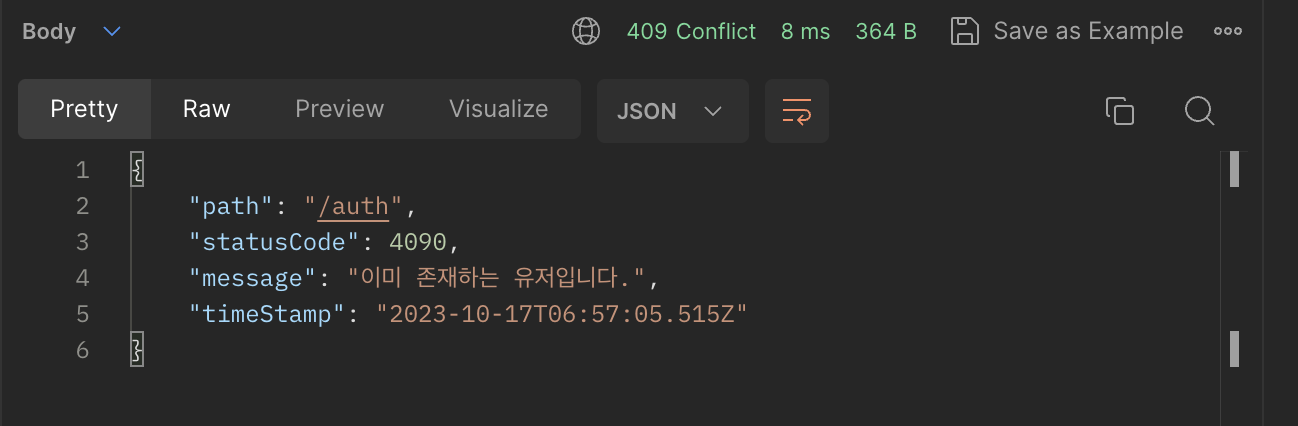
response.status(status).json({
path: request.url,
statusCode: exception.statusCode,
message: exception.message,
timeStamp: exception.timestamp,
});
}
}다음과 같이 ExceptionFilter를 이용하여 만들어둔 BaseException의 값을 응답해줍니다.
최종 결과는 다음과 같습니다.
'개발' 카테고리의 다른 글
| [ Nest.js ] Response 규격 만들기 (Interceptor) (2) | 2023.12.05 |
|---|---|
| [ Node.js ] 메일 전송 실패 에러 (nodeMailer) (2) | 2023.11.30 |
| [ 공식문서 ] 공식문서 링크 모으기 (0) | 2023.10.09 |
| [ 프로젝트 세팅 ] Nest.js + Husky + CommitLint + Gitmoji 세팅 (0) | 2023.09.12 |
| [ 디자인 패턴 ] 1.3 팩토리메서드(FactoryMethod) (0) | 2023.09.11 |


댓글